In this edition of Tech Tips, we are going to cover what is known as “JAMMA,” and certain related issues that crops up with wiring (which affects functionality of controls such as joysticks and buttons.
What is JAMMA?
As you can tell by the name, JAMMA stands for something. The origin of the term comes from the “Japan Amusement Machine and Marketing Association,” a trade organization in Japan.
Back in 1986, they took on a major problem within the video arcade business. Prior to that time, there were many “conversion kits” that were designed to allow an arcade operator to change out a game with a new circuit board, artwork and sometimes a control panel.
The problem was that not all conversion kits were compatible with the existing wiring and connectors that were found inside of games. This made changing games time consuming and could often result in mixed performance and appearances.
To resolve that, JAMMA came up with a new wiring standard, which would be known as the JAMMA standard. This may also be known as a JAMMA wiring harness or a JAMMA arcade game. For any JAMMA game, this means that in most instances, the operator simply had to pull the existing circuit board out of the game, attach the new one, change the art and it was good to go. Games that have used JAMMA varies, and it is not the only standard to have been used out there, but it is the most common. Most games released between 1987 and the early 2000’s have used it.
There are also variations, depending on what a game needs. The standard was only designed to handle up to four buttons for 2 players, so in the event that a game needed to feature six buttons or 4-players, those games would use additional wiring harnesses that would plug directly into the game board. For fighting games like street Fighter II, they used what became known as a “kick harness,” as this provided the three extra inputs used for the row of kicking buttons in that game. 4-player games like Teenage Mutant Ninja Turtles would also use similar harnesses so that all inputs work.
JAMMA Wiring
Here is an example of a typical JAMMA wiring harness. The harness includes the edge connector (these are usually black or blue, and is the piece that plugs into the game circuit board), with each wire being assigned to a specific function for the game.
 There is a solder and a parts side to each harness; this indicates which direction that the edge connector should be plugged. If there is no indication of that, you can tell by looking at the wiring and matching it with the metal contacts found on the arcade board. NEVER plug the connector in the wrong way, as it can permanently damage the hardware.
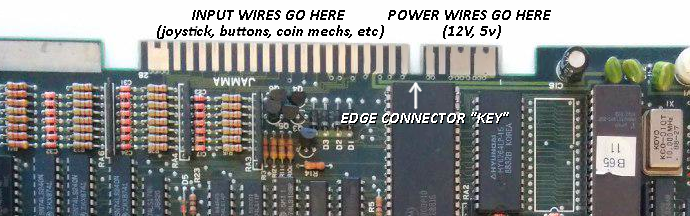
All of the power connections that go to the power supply for providing 5V and 12V electricity are located on the right hand side of the connector (if the connector was unplugged and facing you right-side up). Usually, edge connectors are keyed to help prevent plugging it in the wrong way, but that is not always the case. Here is an example of the piece in the board that the harness connects to:
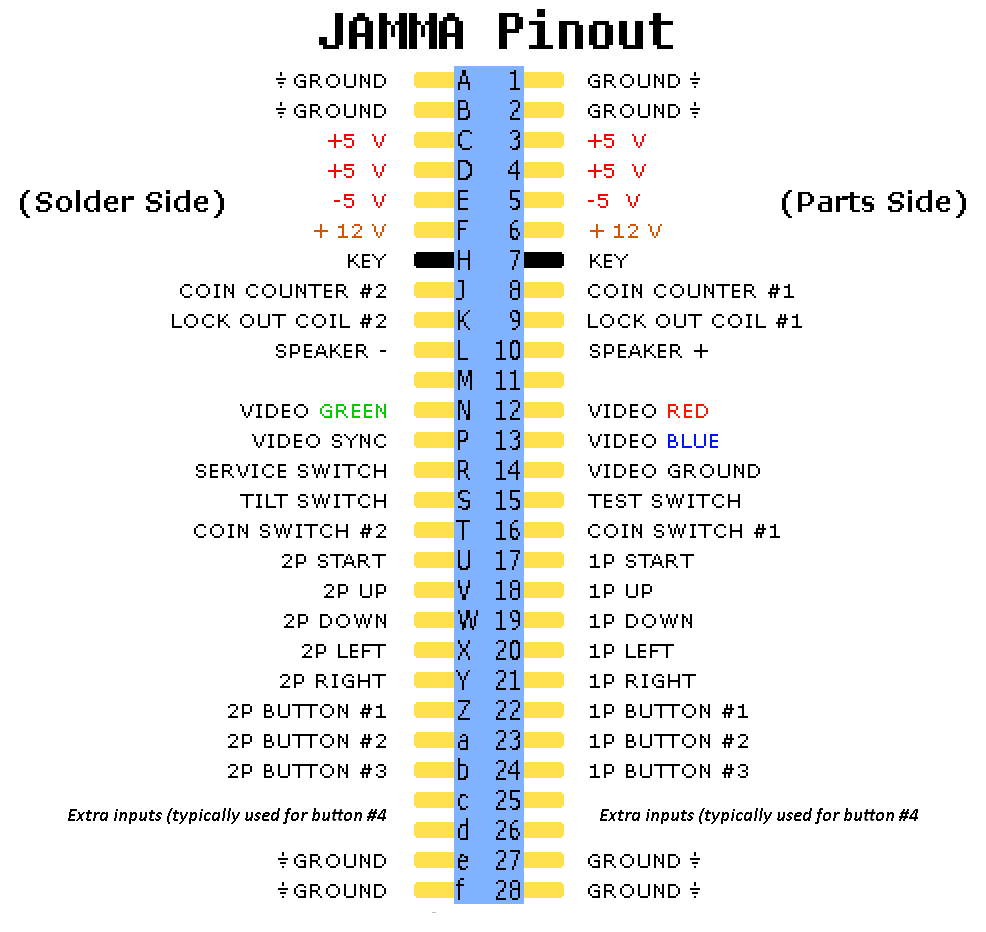
If everything is plugged in correctly with wires in the right place, then games are programmed to recognize signals from these specific pins to perform their function. If a 5v connection is made on pin #17, then the game knows that the 1P start button was pressed; if there’s a signal for pin #V, then the 2nd player’s joystick was pushed up, and so on. This also determines connections for sound and video, so if there is no sound or video, it could have something to do with one of those specific wires. Here is a JAMMA pinout wiring map to use as reference.
Troubleshooting JAMMA Related Problems
When it comes problems with your arcade machine, they may boil down to the wiring. A connection may be loose or disconnected; broken in a pinch area, or a component has failed.
§ The first step in troubleshooting is to ensure that there is power. JAMMA games use what are called “switching power supplies,” which provide the grounding, 12v, 5V and AC power that a game cabinet needs. These will be sold in different amperage’s, but usually you don’t have to worry about that. These power supplies will also feature voltage adjustment knobs on them, which increases/decreases the voltage on the 5V line across the machine. If a feature isn’t working or the game not booting, but the screen is turning on, then there is a possibility that the 5V is too low. Incorrect voltages can also cause issues like game crashes/reboots. You also generally want to avoid going all the way up, as this will increase the heat and can cause components to burn out faster.
§ If you are also experiencing the issue of a game having the screen turn on (it glows/buzzes/ has power) but there is no gameplay, it can be the edge connector itself. If it is 20 years old and has been on every day, it’s normal for the heat to have caused the plastic around the connector to expand. This can cause the metal connectors inside of the harness to loose their tightness, so they may not be making contact with the board. Gently push them back into place (light downward pressure) using something like a small screwdriver or pin. Be careful here however; too much pressure and you can break the pin or the connector.
§ If the issue involves a component like a button or joystick direction not responding, then there is a chance that it could be the microswitch itself. This is best to check before checking the wiring. Remove the connectors from the switch, and put them onto a different switch that you know works. Push it and see what happens. If it does the function of what it was previously connected to, then the switch is bad. If nothing happens, then it could involve the wiring. In this case, check the ground wires first. Improper, disconnected or damaged ground wiring can be an easy fix; these are almost always going to be complete black wires, and can be “daisy chained” together (meaning you can connect multiple switches on one grounding circuit, but be aware that if the circuit isn’t completed on any spot, nothing on that circuit will work).
§ If grounding checks out, then look at the wire itself for that particular component. Turn the power off to the cabinet, then remove the edge connector from the game board. Take a voltimeter, set it to whichever setting shows a circuit (many voltimeters will beep or make a sound when you touch the probes together on this setting). Connect one of the probes to one end of the wire, the other you can put into the edge connector with the corresponding wire pin. If there’s a sound, then the connection is fine. If not, then it’s time to check the wire and make sure that everything is connected. Sometimes, older games may have additional connectors in-between the game board and the controls, so this could be a fault point.
§ If the wrong feature is activating when a button is pushed (say you push ‘light punch’ on Ryu, but he crouches), then this is generally a matter of a wrong connection. Move the connector to the correct spot and the issue should resolve.
This covers most major issues when it comes to wiring and the JAMMA harness. Also keep in mind that there are other harnesses out there, like JVS (used with Sega NAOMI games), unique pinouts from much earlier games or in modern games that use unique I/O boards and current PC hardware. In the case of the latter, most controls interface via USB, so if there are problems with the control in that instance, it can be a USB issue.
If you are having any problem with a product you bought from PrimeTime Amusements, then please contact our technical support. If you’re looking for more Tech Tips, then click here!